Top Acoustic Guitar Kits

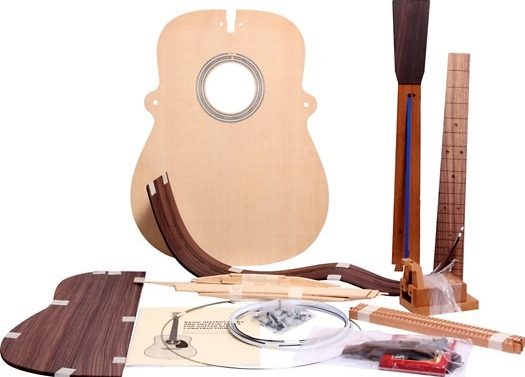
Acoustic guitar kits are a great option for beginners who are interested in learning how to play the guitar. These kits typically include all the necessary components to build your own acoustic guitar, including the body, neck, hardware, and strings. They are designed to be beginner-friendly, with detailed instructions and all the tools you need to complete the project.
One of the main benefits of starting with an acoustic guitar kit is that it allows beginners to have a hands-on experience in building their own instrument. This can be a rewarding and fulfilling process, as it gives you a sense of personal satisfaction and pride in creating something with your own hands. Additionally, building your own guitar allows you to understand the mechanics and components of the instrument, which can be valuable knowledge as you progress in your guitar-playing journey.
In this blog post, we will explore the benefits of building your own acoustic guitar, discuss some of the top acoustic guitar kits available on the market for every budget, provide tips for choosing the right wood for your kit, outline the tools and supplies you’ll need for the building process, offer a step-by-step guide to building your acoustic guitar kit, provide tips for customizing your guitar to your style, discuss maintenance and care for your guitar, and offer playing tips and techniques for your new instrument.
The Benefits of Building Your Own Acoustic Guitar
Building your own acoustic guitar comes with several benefits that make it an attractive option for beginners. One of the main advantages is the personal satisfaction and pride that comes with creating something from scratch. Building a guitar requires time, effort, and attention to detail, and seeing the finished product can be incredibly rewarding. It’s a tangible representation of your hard work and dedication.
Another benefit of building your own acoustic guitar is that it allows you to understand the mechanics and components of the instrument. As you assemble each part, you’ll gain a deeper understanding of how the guitar works and how each component contributes to its sound. This knowledge can be valuable as you progress in your guitar-playing journey, as it will help you troubleshoot any issues that may arise and make adjustments to improve the sound quality.
Building your own guitar also gives you the opportunity to customize it to your liking. Acoustic guitar kits often come with options for different wood types, finishes, and hardware. This allows you to create a unique instrument that reflects your personal style and preferences. Whether you want a natural wood finish or a bold color, building your own guitar gives you the freedom to make it your own.
Lastly, building your own acoustic guitar can potentially save you money compared to buying a pre-made instrument. While the initial cost of the kit and tools may seem high, building your own guitar allows you to cut out the middleman and avoid the markup that comes with buying a pre-made instrument. Additionally, if you take good care of your guitar, it can last for many years, making it a worthwhile investment.
Top Acoustic Guitar Kits for Every Budget
There are several acoustic guitar kits available on the market for every budget. Whether you’re a beginner on a tight budget or someone looking for a high-end kit, there’s an option out there for you.
For beginners on a budget, one popular option is the Fender FA-115 Acoustic Guitar Bundle. This kit includes everything you need to get started, including the guitar, gig bag, tuner, picks, and instructional materials. The Fender FA-115 is known for its great sound quality and playability, making it an excellent choice for beginners.
If you’re looking for a mid-range option, the Martin Build Your Own Guitar Kit is worth considering. Martin is a renowned brand in the guitar industry, known for their high-quality instruments. This kit allows you to build your own Martin guitar, giving you the opportunity to experience the craftsmanship and sound that Martin guitars are known for.
For those with a larger budget, the Taylor Guitars Build to Order program offers a unique opportunity to build your own custom Taylor guitar. With this program, you can choose from a variety of body shapes, wood types, and other custom options to create a one-of-a-kind instrument. While this option may be more expensive, it allows you to create a guitar that is tailored to your exact specifications.
When choosing an acoustic guitar kit, it’s important to consider your skill level and budget. Some kits may be more suitable for beginners, while others may require more advanced woodworking skills. It’s also important to read reviews and do your research to ensure that the kit you choose is of good quality and will provide a satisfying building experience.
Choosing the Right Wood for Your Acoustic Guitar Kit

The choice of wood for your acoustic guitar kit is an important factor that can greatly impact the sound quality and aesthetics of your instrument. Different types of wood have different tonal characteristics, so it’s important to choose the right wood for your desired sound.
One of the most common woods used for acoustic guitars is spruce. Spruce is known for its bright and balanced tone, making it a popular choice for the top or soundboard of the guitar. Cedar is another popular choice for the top, as it produces a warmer and more mellow tone compared to spruce.
For the back and sides of the guitar, rosewood is a common choice. Rosewood is known for its rich and complex tone, with pronounced bass response and sparkling highs. Mahogany is another popular choice for the back and sides, as it produces a warm and focused tone with strong midrange presence.
When choosing the wood for your acoustic guitar kit, it’s important to consider not only the tonal characteristics but also the aesthetics. Different woods have different grain patterns and colors, which can greatly impact the appearance of your instrument. Some people prefer a natural wood finish to showcase the beauty of the wood, while others may prefer a colored or stained finish for a more unique look.
It’s also worth noting that the choice of wood can impact the price of your kit. Exotic woods such as Brazilian rosewood or koa are more expensive compared to more common woods like mahogany or maple. If budget is a concern, there are still plenty of affordable options available that can produce great sound quality.
When choosing the wood for your acoustic guitar kit, it’s important to do your research and consider your personal preferences. If possible, try to listen to guitars made from different woods to get an idea of the tonal characteristics you prefer. Ultimately, the choice of wood is a personal one and should be based on what sounds and looks best to you.
Tools and Supplies You’ll Need to Build Your Acoustic Guitar
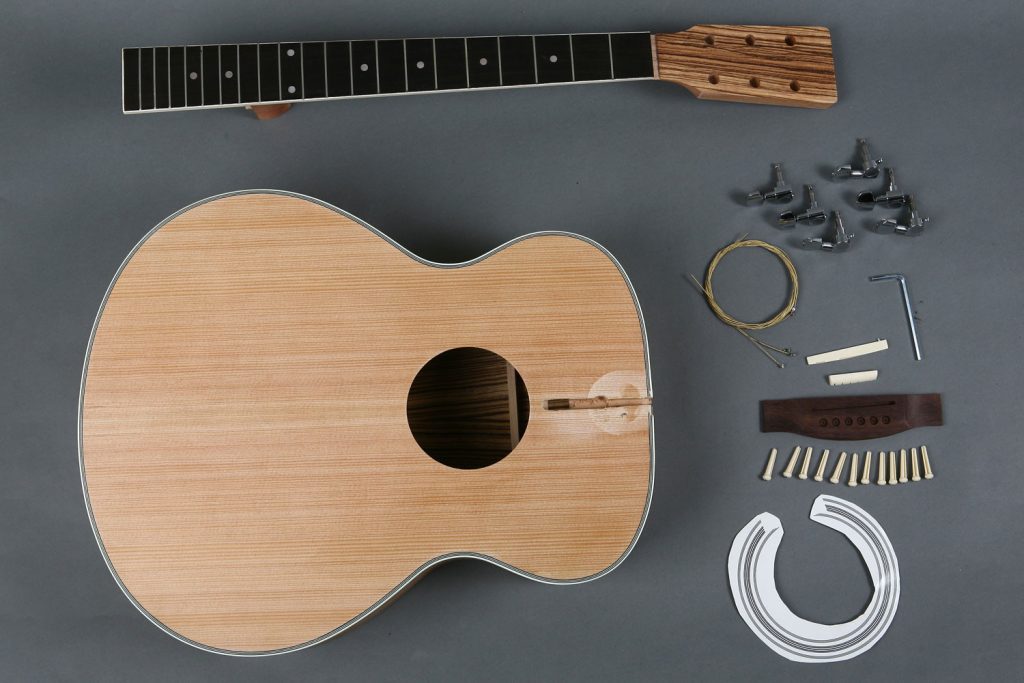
Building your own acoustic guitar requires a variety of tools and supplies. While some kits may come with some of the necessary tools, it’s likely that you’ll need to acquire additional tools to complete the project. Here is a list of the basic tools and supplies you’ll need:
1. Clamps: Clamps are essential for holding the guitar components together while the glue dries. It’s recommended to have a variety of clamps in different sizes and shapes to accommodate different parts of the guitar.
2. Chisels: Chisels are used for shaping and carving the wood. It’s important to have a set of sharp chisels in different sizes for various tasks.
3. Files and rasps: Files and rasps are used for shaping and smoothing the wood. They come in different shapes and sizes, so it’s good to have a variety on hand.
4. Sandpaper: Sandpaper is used for smoothing and finishing the wood. It’s recommended to have different grits of sandpaper, ranging from coarse to fine, for different stages of the building process.
5. Router: A router is used for cutting and shaping the wood. It’s a versatile tool that can be used for various tasks, such as routing the binding channels or shaping the neck.
6. Drill: A drill is used for drilling holes and installing hardware, such as the tuning machines and bridge pins.
7. Saw: A saw is used for cutting the wood to size. It’s recommended to have a fine-toothed saw for precise cuts.
8. Glue: Wood glue is used for joining the guitar components together. It’s important to use a high-quality wood glue that provides a strong bond.
9. Finish: A finish is applied to the wood to protect it and enhance its appearance. There are various types of finishes available, including lacquer, varnish, and oil finishes.
10. Brushes and applicators: Brushes and applicators are used for applying the finish to the wood. It’s recommended to have different sizes of brushes and applicators for different areas of the guitar.
These are just some of the basic tools and supplies you’ll need to build your acoustic guitar kit. Depending on the specific kit you choose and your personal preferences, you may need additional tools or supplies. It’s important to read the instructions provided with your kit and do your research to ensure that you have all the necessary tools and supplies before you begin the building process.
If you’re on a budget, there are several ways to acquire tools and supplies without breaking the bank. One option is to borrow tools from friends or family members who may already have them. Another option is to look for used tools online or at local garage sales or flea markets. Additionally, some woodworking stores offer rental services where you can rent tools for a specific period of time.
Step-by-Step Guide to Building Your Acoustic Guitar Kit
Building your own acoustic guitar can be a complex and time-consuming process, but with the right instructions and patience, it’s a rewarding and fulfilling experience. Here is a step-by-step guide to building your acoustic guitar kit:
1. Prepare the workspace: Before you begin building, it’s important to set up a clean and organized workspace. Make sure you have enough room to work comfortably and that all your tools and supplies are easily accessible.
2. Read the instructions: Carefully read the instructions provided with your kit before you begin. Familiarize yourself with the steps involved and make sure you understand each one.
3. Prepare the wood: Start by preparing the wood for assembly. This may involve cutting the wood to size, shaping it, and sanding it to remove any rough edges or imperfections.
4. Glue the components: Begin by gluing the components of the guitar together. This may include gluing the top and back to the sides, attaching the neck to the body, and installing any other necessary components.
5. Clamp the components: Once the components are glued together, use clamps to hold them in place while the glue dries. Make sure to apply even pressure to ensure a strong bond.
6. Shape and carve the wood: After the glue has dried, use chisels, files, and rasps to shape and carve the wood. This may involve shaping the neck, carving the bracing on the top, and smoothing any rough surfaces.
7. Install hardware: Once the wood is shaped and carved, it’s time to install the hardware. This may include installing the tuning machines, bridge, nut, and saddle.
8. Apply finish: After all the hardware is installed, it’s time to apply a finish to protect and enhance the wood. Follow the instructions provided with your chosen finish for best results.
9. Set up the guitar: Once the finish has dried, it’s time to set up the guitar. This may involve adjusting the truss rod, filing the nut and saddle, and adjusting the action and intonation.
10. String the guitar: Finally, string the guitar and tune it. Make any necessary adjustments to ensure that it plays and sounds as desired.
It’s important to take your time and pay attention to detail throughout the building process. Building a guitar requires precision and patience, so don’t rush through the steps. If you encounter any difficulties or have questions, don’t hesitate to seek help from experienced builders or online forums.
Tips for Customizing Your Acoustic Guitar to Your Style

One of the great advantages of building your own acoustic guitar is the ability to customize it to your style and preferences. Here are some tips for customizing your guitar:
1. Choose a unique wood: Consider using a unique wood for your guitar to give it a distinctive look. Exotic woods like zebrawood or spalted maple can add visual interest and make your guitar stand out.
2. Experiment with finishes: Instead of using a traditional clear finish, consider experimenting with different finishes to achieve a unique look. Stains, dyes, and colored lacquers can all be used to create interesting effects.
3. Add inlays: Inlays are decorative elements that can be added to the fretboard, headstock, or body of the guitar. They can be made from materials like mother-of-pearl or abalone and can add a touch of elegance to your instrument.
4. Customize the pickguard: The pickguard is a protective plate that is placed on the body of the guitar near the soundhole. Consider customizing the pickguard with a unique design or material to add a personal touch.
5. Install different hardware: Consider upgrading the hardware on your guitar, such as the tuning machines or bridge pins. High-quality hardware can improve the performance and playability of your instrument.
6. Modify the sound: If you’re not completely satisfied with the sound of your guitar, consider making modifications to improve it. This could involve adjusting the bracing, changing the nut or saddle material, or experimenting with different strings.
7. Personalize the case: Don’t forget about the case! Consider personalizing your guitar case with stickers, patches, or other decorations to make it unique to you.
Remember, customization is all about personal preference and making your guitar reflect your style and personality. Don’t be afraid to get creative and try new things. Your guitar is a reflection of you, so make it something that you love.
Maintenance and Care for Your Acoustic Guitar
Proper maintenance and care are essential for keeping your acoustic guitar in good condition and ensuring optimal sound quality. Here are some tips for maintaining and caring for your guitar:
1. Clean your guitar regularly: Use a soft cloth to wipe down your guitar after each use to remove any dirt, sweat, or oils that may have accumulated. Avoid using harsh chemicals or abrasive cleaners, as they can damage the finish.
2. Keep your guitar in a suitable environment: Acoustic guitars are sensitive to changes in temperature and humidity. Avoid exposing your guitar to extreme temperatures or high humidity levels, as this can cause damage to the wood.
3. Use a humidifier: If you live in a dry climate or during the winter months when indoor heating can cause low humidity levels, consider using